Tips for Booking Plans For Students Web Version
- Frederick, MD
- Aug 7, 2025
- 3 min read
Updated: Aug 18, 2025
Note this is for individual students. Bands/Groups are another tip
First, navigate to the Members tab and then click on the Students sub-tab. Find the student you want to set up a billing plan for.

Once you've found the student, click the pink triangle next to their name. This will open a menu with more options. Select Edit Student.

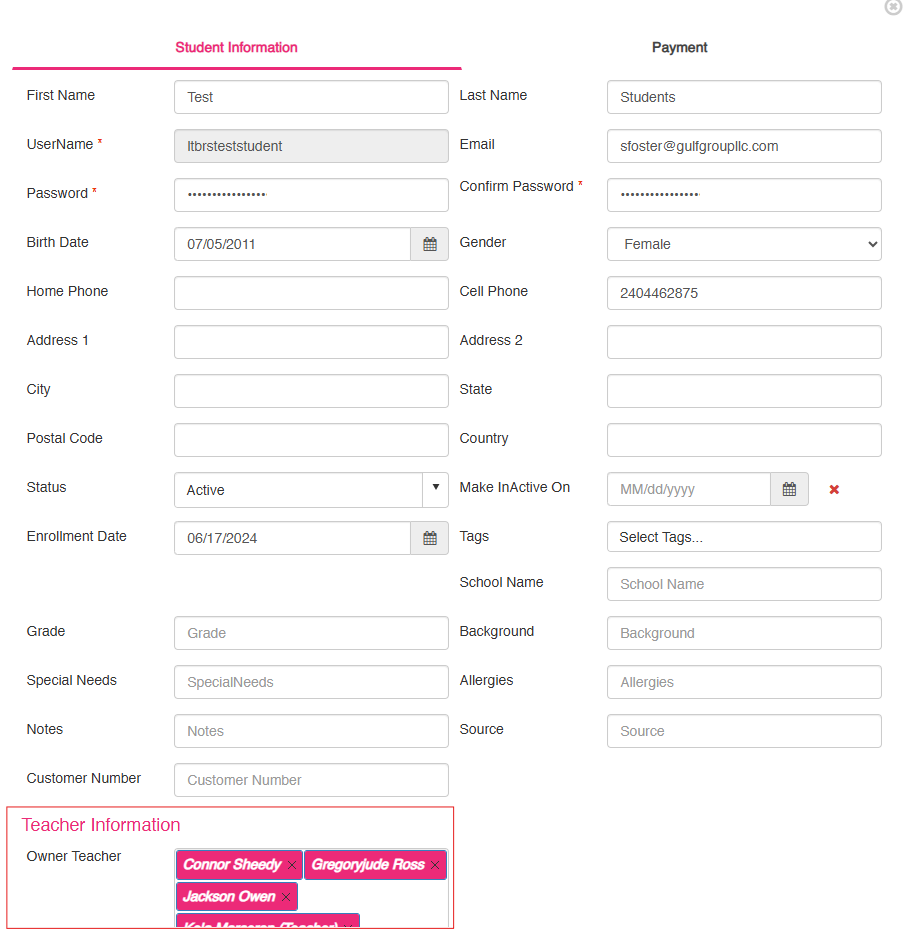
In the Edit Student section, scroll down to the Teacher Information section. Click in the white box next to Owner Teacher to open a list of all the teachers at the school. Select the teacher(s) the student will be on the schedule with.
From the left-hand menu, select Schedule and then Weekly Schedule.
Once the schedule loads, you'll need to select the correct teacher from the dropdown menu. You will also see either "Unassigned Students" or "Assigned Students" at the top.
Click Unassigned Students for students who do not yet have a billing plan associated with this teacher.
Click Assigned Students for students who already have a billing plan with this teacher.

After the list of students loads, click and drag the student's name onto the desired spot on the schedule.

On this first screen, you only need to update the Lesson Type or select a Room if your school uses those options. The frequency and lesson length will be automatically set once you select the billing plan.
Then, click the Book Plan box in the bottom-left corner to continue.

At the top, click the Choose Plan dropdown menu to see a list of every plan you have created. Select the correct plan from the list.
You can ignore the Start Count for now. If you're giving the student a discount, enter the amount in the Discount section as either a percentage or a specific dollar amount.
The system will default to Credit/Debit Card for the payment method, so be sure to change this if the student will be paying with ACH, cash, or a check.
The Start Date is one of the most important fields to set correctly. This is the date the student will be charged, not the first day of their lesson. If a student is starting in the middle of the month, always select the start date for the next month.
For example, if a student starts on August 18th but will be charged on the first of every month, you would set the start date to September 1st. This ensures they are charged on the first of every month moving forward.
Keep the No End Date box checked so the plan runs indefinitely.
You can also select the student's saved credit card from the dropdown menu, which helps with future payment reporting. Don't worry if you forget to select a card; the system will still process the payment.
We will scroll down to the bottom now which will show this below.

The final important step is to use the Lesson Proration boxes. This is where you can prorate a student who starts in the middle of a month, so you don't charge them the full amount.
In the first box, enter the prorated dollar amount.
In the second box, a calendar will pop up where you can select the specific date the system will charge the student.
Let's go back to our August 18th example. The student will need to be prorated because they are only taking two lessons (two Tuesdays) for the month, which is half of the normal four weeks. If their normal monthly price is $160, you would charge them $80 and select today's date on the calendar for the charge to be processed.
The last and most important step is to always click SAVE.


Comments